Článek
Setting up a professional live stream, whether for a corporate event, a sports broadcast, or a regular content schedule, starts with the right software configuration. First things first, you must be able to produce high-quality streams. To do that, you’ll need to have high-quality screen recordings, crisp audio output, and an optimized recording path.
Currently, OBS Studio is one of the most popular live-streaming software on the market. It supports the Real-Time Messaging Protocol and has versatile RTMP-enabled software encoders. They allow professional broadcasters to stream video directly to a media server or other destinations.
As an open-source and versatile software, OBS is widely used for its ability to integrate RTMP streaming easily, delivering high-quality, low-latency streams to various streaming platforms. The best part? OBS Studio is a free broadcasting software. It has an integrated video encoder application for encoding, mixing, and more.
If this sounds like what you’re looking for, join us as we explain how to use OBS Studio and how to master all of its settings. Furthermore, we’ll tell you how to position multiple video sources, choose the best encoder, and more. By the end, you’ll be ready to start your very own professional online stream.
If you’re on v31, notable adds included Amazon IVS integration, YouTube Chat support, NVIDIA Background Blur, and Intel QSV AV1 Screen Content Coding.
TL, DR:
- Fastest pro workflow: Install OBS → build Scenes + Sources → set CBR + keyframe 2s + AAC 48 kHz → paste Dacast RTMP URL + Stream Key → run a 60–120s test stream.
- Dacast-safe encoder baseline: H.264 + AAC, CBR, keyframe = 2 seconds, 30 fps (start here; raise fps only if needed).
- Bitrate rule of thumb: pick a resolution, then set bitrate based on stable upload speed (leave headroom to avoid dropped frames).
- AV1 + WHIP: OBS supports WHIP/WebRTC, but Dacast ingest is RTMP/H.264, so use Custom RTMP for Dacast. WHIP is for platforms that explicitly provide a WHIP URL/token.
- Most common failures: wrong keyframe interval, VBR instead of CBR, mismatched audio sample rate, overloaded CPU/GPU, or Wi-Fi instability.
New to Dacast and interested to try out our RTMP streaming platform for yourself? Sign up today for a 14-day trial to test out all of our features for free. No credit card is required.
Table of Contents
- What is OBS Studio Used For?
- OBS Studio Step-by-Step Guide: How to Set Up and Start Streaming
- How to Get Started Recording with OBS Studio
- How to Add Video Sources on OBS Studio
- How to Use OBS Studio Window Capture
- How to Add Images or Text with OBS Studio
- How to Arrange Multiple Video Sources on OBS Studio
- How to Set Up OBS Studio Hotkeys
- Recommended OBS Bitrate Settings
- Choosing the Right OBS Studio Encoder Settings
- The Right Hardware Setup For Running OBS
- How to Use OBS Studio with Dacast
- Multistreaming with OBS
- Integrating OBS Studio With Zoom
- OBS Studio Video Tutorial
- Streamlabs Desktop vs. OBS Studio (2026)
- FAQs
- Conclusion
What is OBS Studio Used For?
OBS Studio is a free and open-source streaming software that many broadcasters use for mixing and producing live video content. This means that unlike some paid options, you can download and use OBS Studio for free without any limitations. The latest version of OBS Studio, Version 31.0.4 was released in March 2025. It is available for macOS 12 or newer, Windows 10 and 11, as well as Ubuntu 20.04 and newer operating systems. For the Linux version, FFmpeg is required. There are many guides available online to help you install it if needed.
OBS Studio isn’t just limited to live streaming, though. It’s also a powerful tool for screen capture. If you want to record a tutorial, gameplay footage, or anything else on your screen, OBS Studio can handle it with ease. Using OBS Studio, you can live stream your content to multiple popular streaming platforms, including YouTube, Twitch, and Facebook, to name a few. OBS lets you reach your audience wherever they choose to watch. Some of the main functions of OBS Studio are:
- Encoding
- Screen recording
- Adding text
- Adding graphic overlays
- Managing multiple stream sources
OBS operates with community-developed plugins, which you can find on the OBS Forums page. Since OBS Studio software is open-source software, we often recommend that new broadcasters use it to experiment and learn the ropes of video production.
OBS Studio Step-by-Step Guide: How to Set Up and Start Streaming
OBS Studio is a powerful open-source broadcasting and recording software. To use all of the functions of OBS Studios, you must set up OBS to flow with your streaming setup. Luckily, the OBS Auto-Configuration Wizard is available to automatically determine the proper settings for your computer and streaming solution. This wizard is a great resource, especially for beginners new to OBS and video streaming in general. It will account for your internet upload speed, processor capabilities, and desired video quality, then recommend the best OBS settings for recording. Even with the Auto-Configuration Wizard tool, there are a few manual configurations that you’ll need to set up to optimize OBS for streaming.
Follow these steps to set it up and start streaming or recording like a pro:
Step 1: Download and Install OBS Studio
- Visit the official OBS Studio website.
- Download the version compatible with your operating system (Windows, macOS, or Linux).
- Install OBS Studio and launch it.
Step 2: Configure Basic Settings
- When launching OBS for the first time, use the Auto-Configuration Wizard to optimize settings based on your system and internet speed.
- Manually adjust output settings under Settings > Output, choosing your desired resolution, bitrate, and encoder.
Step 3: Add Sources to Your Scene
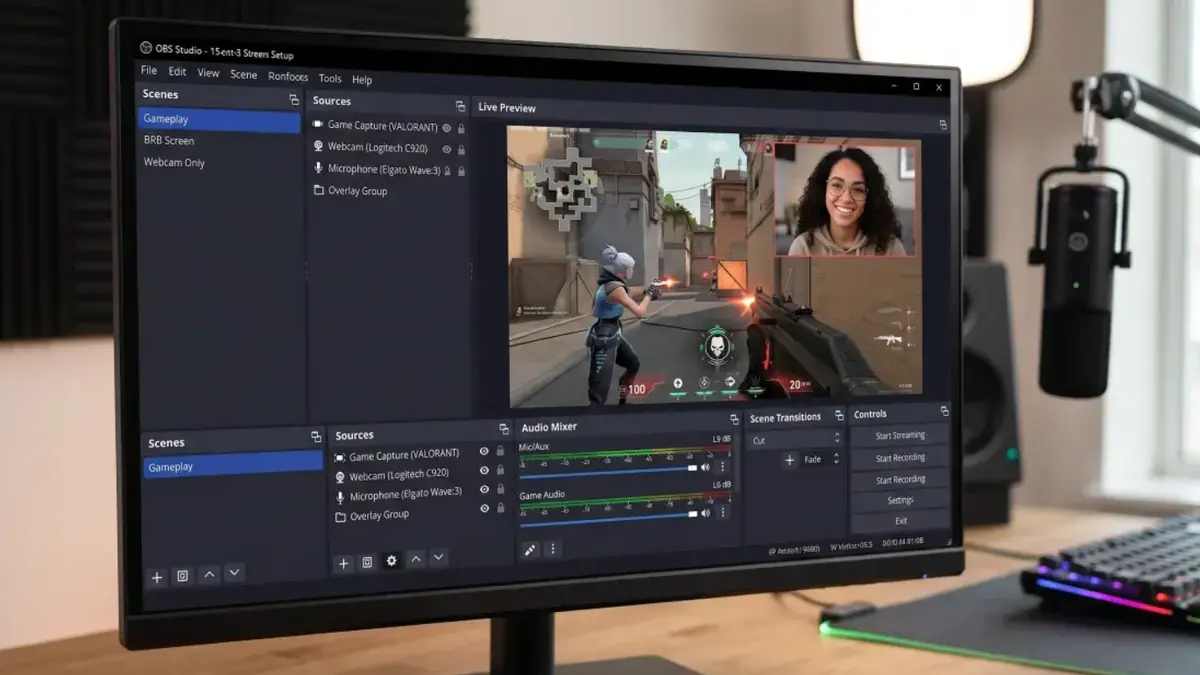
- Create a new Scene from the “Scenes” box.
- Click + in the “Sources” box to add video sources like Display Capture, Window Capture, Game Capture, or Video Capture Device (for webcams).
- Adjust positioning and size within the preview window.
Step 4: Set Up Audio Input and Output
- Navigate to Settings > Audio to configure your microphone and desktop audio sources.
- Use the Audio Mixer panel to monitor and adjust volume levels.
Step 5: Connect to a Streaming Platform (Optional)
- Go to Settings > Stream and select your preferred streaming service (Twitch, YouTube, Facebook Live, etc.).
- Enter your Stream Key (found in your streaming account).
- Click Apply and OK to save settings.
Step 6: Adjust Scene Transitions & Overlays (Optional)
- Add professional overlays or animated transitions for a polished look.
- Configure scene transitions in the Scene Transitions panel.
Step 7: Start Streaming or Recording
- Click Start Streaming if you’re broadcasting live.
- Click Start Recording to save content locally.
Step 8: Monitor Performance & Troubleshoot
- Use the Stats panel to check CPU usage and dropped frames.
- Make necessary adjustments to improve performance.
By following these steps, you can effectively use OBS Studio for professional-quality streaming and recording.
Check out the OBS Studio Quickstart Guide for more information on how to use OBS Studio. With that general process in mind, let’s look at how to use OBS Studio and all of its different functions for streaming. We’ll also learn how to record with OBS, add a video source, setup hotkeys, incorporate the right hardware, and more.
How to Get Started Recording with OBS Studio
Recording video content using OBS Studio is simple and highly customizable. Follow these steps to start recording efficiently:
Step 1: Set Up OBS Studio for Recording
- Open OBS Studio and create a new Scene (if you haven’t already).
- Add a Source (e.g., Display Capture, Window Capture, or Game Capture).
- Ensure your microphone and system audio are correctly set up in the Audio Mixer panel.
Step 2: Configure Output Settings
- Go to Settings > Output and set the Output Mode to “Simple” or “Advanced” (for more control over formats and bitrate).
- Choose a recording format under Recording Format (MP4, MKV, FLV, etc.).
- Set your Recording Quality (options range from high-quality file sizes to space-efficient ones).
- Select an Encoder (Software x264 for CPU-based encoding or Hardware NVENC/AMD for GPU encoding).
- Choose a Recording Path (where your recordings will be saved).
Step 3: Adjust Video and Audio Settings
- Under Settings > Video, select the Base (Canvas) Resolution and Output (Scaled) Resolution.
- Adjust the FPS (Frames Per Second) depending on the smoothness required (30 FPS for standard recording, 60 FPS for high-action content).
- In Settings > Audio, ensure the right microphone and desktop audio devices are selected.
Step 4: Start and Stop Recording
- Click Start Recording in the main OBS window.
- Perform your recording session.
- Click Stop Recording when done.
- Find your saved file in the Recording Path you set earlier.
Step 5: Optimize Your Recording (Optional)
- Reduce file sizes by adjusting bitrate and resolution.
- Improve audio clarity with noise suppression and filters.
- Edit the recording in video editing software if needed.
With these steps, you can easily record high-quality videos using OBS Studio for content creation, tutorials, or game recording.
How to Add Video Sources on OBS Studio
To start streaming on OBS Studio, you need to add video sources, such as webcams or digital cameras. Luckily, it’s one of the simplest tasks you can do in OBS Studio. To select a source in OBS, all you need to do is:
- First, plug the device into your computer to add a video source, such as a webcam or a camera connected via a capture card.
- Then, click the “+” sign inside the “Sources” widget on OBS Studio.
- This will generate a drop-down menu with three different choices: Display Capture, Window Capture, and Video Capture Device.
- Select “Video Capture Device” to add a camera.
- Then, you will be asked to name your video source. You can add an existing one or create a new one
- At this stage, you can also choose to flip the image vertically or horizontally, adjust the opacity, change the resolution, or set up a chroma-key (green screen) effect.
- When you are done, click “OK,” and your video source will be added.
If you see blank space around your feed, adjust the broadcast resolution in Settings to match your video input. A black screen may appear if OBS can’t capture certain apps; fix this by running OBS as administrator, updating graphics drivers, or adjusting compatibility settings. For game capture, ensure the game is in full-screen mode.
OBS also includes an audio mixer to manage multiple audio sources. You can mix, mute, and control audio levels during your stream.
Audio/video sync issues often result from incorrect settings or conflicting devices. Check the audio buffer and ensure all sources are synchronized in OBS settings.
How to Use OBS Studio Window Capture
If you want to share your computer screen during your broadcast, you can either use Display or OBS Window Capture. Let’s go over how to use window capture.
Display Capture will broadcast everything in a certain area of your computer screen, although you can change and adjust the size of that area. Window Capture for OBS will allow you to broadcast the screen of a particular application (Skype, Word, PowerPoint, Internet Browsers, etc.) and only that. Here’s how to set up a Display Capture:
- Go to the “Sources” widget, click on the “+” sign, and select “Display Capture.”
- Give it a name and click “OK.”
From there, you can choose whether you want the mouse cursor to be captured or not. You can also set the opacity and select a „Sub-Region“ to create a smaller area of your monitor screen to capture:
- For Windows Capture, go to the “Sources” widget, click on the “+” sign, and select “Window Capture.”
- Name the source and click “OK.”
- Select which application you want to use for OBS Window Capture from the drop-down menu. If you don’t see the one you wanted, try re-launching OBS or the program (or both). If it still doesn’t appear, use “Monitor Capture” instead.
- Choose whether you want to capture the Entire Screen or the Inner Screen. You can choose if the mouse cursor is captured or not, the opacity, and create a smaller sub-region.
- Click “OK” when you’re done.
This is how you record a window on OBS and get it to show your screen when recording a video.
How to Add Images or Text with OBS Studio
You can also use OBS to make your streams more visually interesting and engaging by adding fun graphics, images, and even text. So, how can you add those things to your OBS streaming setup? The process is fairly simple. Here’s what you need to do to add images:
- Right-click under sources, then click “Add.”
- Select and click on “Image.”
- Browse for the image you want to add and adjust the opacity.
- Select several individual files or an entire folder to add an image slideshow.
The process of adding text to your OBS stream is very similar.
- Go to “Sources” and press “+.”
- Click on “Text (GDI+).”
- Create a new source or add an existing one.
- Click “Select Font” to choose the color, style, and size.
- Add the text in the text box.
- Once done, click on OK.
- Drag and drop the text box where you want it on the screen.
Using the menu settings, you can choose the color, opacity, font, size, and message. Also, you can indicate whether or not you want the text to scroll, and you can set the scroll speed.
Resources (Download):
https://drive.google.com/drive/folders/1ulsIEMcifRg-6fBegkuUj2p5VVCurl39